Native App Print for Windows
How to install and setup the Hardware
Applicable Interface
USBConnecting
Connecting
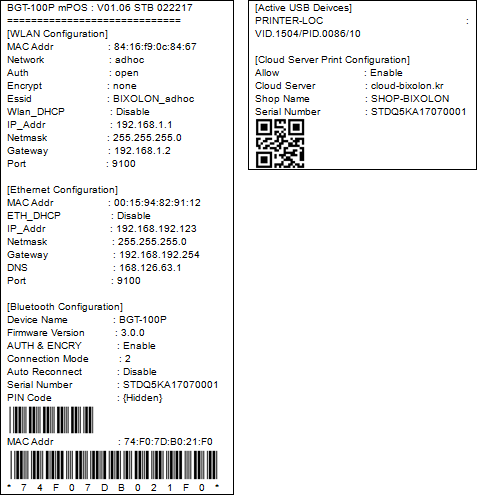
• After B-gate booting is complete, proceed to "Opening the printer cover → Pressing the Feed key → Closing the printer cover", and the B-gate self-test describing the LAN configuration information is printed.
• Check the ETH_DHCP value in the self-test. If the value is Disabled, open the network configuration of the host (e.g., PC) and set the LAN of the host to the same as the LAN configuration of the B-gate. For example, if the default IP of the B-gate is 192.168.192.168, set the IP of the host to 192.168.192.x (x = 1 ~ 254) and the Subnet Mask to 255.255.255.0.
• When connecting the LAN cable with the ETH_DHCP value set to Enabled, the B-gate automatically brings IP information from the DHCP server (router). By printing the self-test of B-gate, you can check the IP assigned to B-gate.• Utilities are provided so that users can set up the interface.
• Web Utilities: It can be accessed by entering IP of B-gate in the address window of the web browser.
• Native Utilities: Utility apps that can run on each OS are provided.Wireless LAN
Connecting
• Connect the supported WLAN dongle to the B-gate, and turn on the B-gate.
• After B-gate booting is complete, proceed to "Opening the printer cover → Pressing the Feed key → Closing the printer cover", and the B-gate self-test describing the WLAN configuration information is printed.
• First check the network value in the self-test. If the value is adhoc, open the wireless connection menu of the host (PC, tablet, smartphone) and set it as adhoc before connecting. The default network mode for B-gate is adhoc, ESSID is BIXOLON_adhoc, and IP address is 192.168.1.1.
• If the value is infra, connect the host to the AP connected to the B-gate.
• Check the WLAN_DHCP value in the self-test. If the value is disable, the host (e.g. PC), open the network configuration and set the host's WLAN to the same as the B-gate's WLAN configuration. For example, if the default IP of the B-gate is 192.168.192.168, set the host IP to 192.168.192.x (x = 1 ~ 254) and Subnet Mask to 255.255.255.0.
• When connecting the LAN cable with the ETH_DHCP value set to enabled, the B-gate automatically brings IP information from the DHCP server (router). By printing the self-test of B-gate, you can check the IP assigned to B-gate.• Utilities are provided so that users can set up the interface.
• Web Utilities: It can be accessed by entering the IP of B-gate in the address window of web browser.
Connecting
• Turn on the B-gate that supports Bluetooth.
• After B-gate booting is complete, proceed to "Opening the printer cover → Pressing the Feed key → Closing the printer cover", and the B-gate self-test describing the WLAN configuration information is printed.
• Check the device Name value in the self-test.
• Pair the devices you want to connect from the list of devices found in the host.
• Utilities are provided so that users can set up the interface.
• Native Utilities: Utility apps that can run on each OS are provided.
How to install peripherals
ConnectingConnect supported peripherals to the USB-A type on the back of the B-gate, and turn on the B-gate.
After B-gate booting is complete, proceed to "Opening the printer cover → Pressing the Feed key → Closing the printer cover", and the B-gate self-test describing the enabled peripheral configuration information is printed.
Development Environment
Install Visual Studio. (Visual Studio 2008 or later is recommended)Refer to Microsoft's homepage (Visual studio installation guide page)
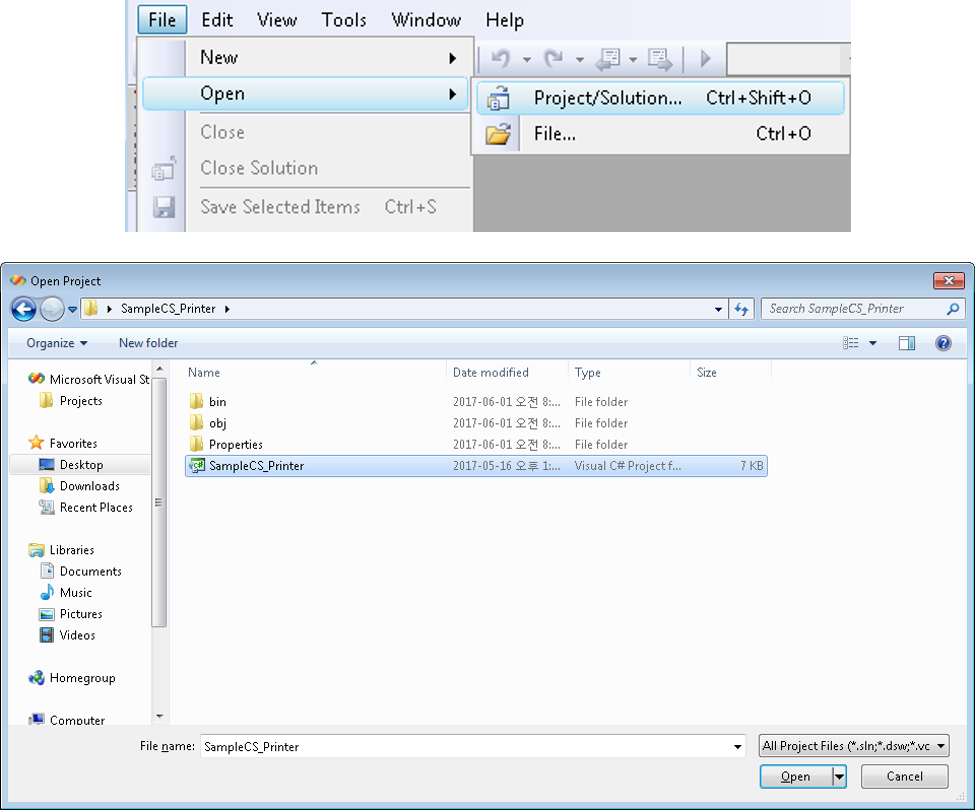
https://docs.microsoft.com/en-us/visualstudio/install/install-visual-studio1) Opening Sample Project
2) Copying library files
Library files are provided in the Lib folder of the SDK folder divided into use with x86 and x64. You should use the DLL file that matches your program. In case of building the program for x86, you should use the x86 library file. Copy the mPosxxx.dll file of the device you want to use to the place where the executable file of the project is created. In this case, the library file must be in the same folder as the executable file.
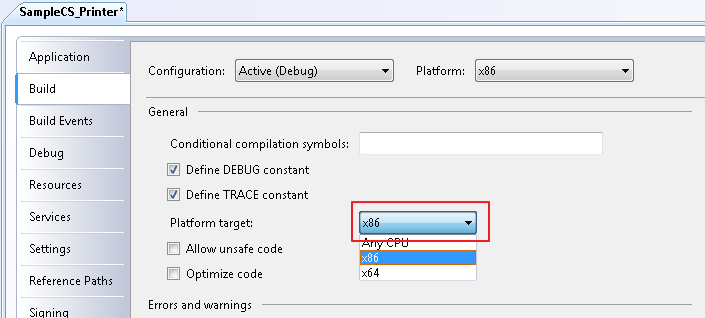
3) Changing platform targets for building projects
The value of the project should be changed to match the platform target of the DLL. If the target is different, it may not operate normally. In case of 'Any CPU' in C #, 'x86' or 'x64' must be selected because there may occur a problem if the OS bit version of the development environment is different from that of the real environment.