


Native App Print for iOS
How to install and setup the Hardware
Applicable Interface
USBConnecting
Connecting
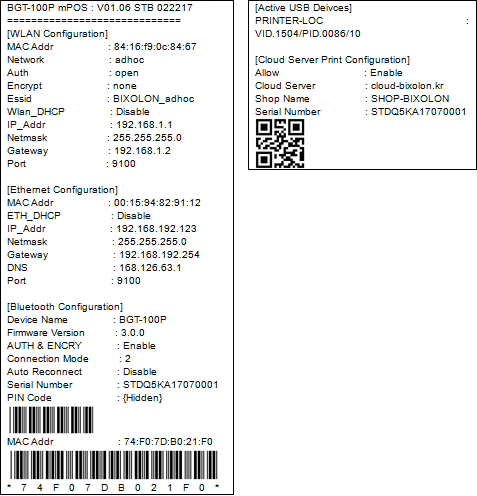
• After B-gate booting is complete, proceed to "Opening the printer cover → Pressing the Feed key → Closing the printer cover", and the B-gate self-test describing the LAN configuration information is printed.
• Check the ETH_DHCP value in the self-test. If the value is Disabled, open the network configuration of the host (e.g., PC) and set the LAN of the host to the same as the LAN configuration of the B-gate. For example, if the default IP of the B-gate is 192.168.192.168, set the IP of the host to 192.168.192.x (x = 1 ~ 254) and the Subnet Mask to 255.255.255.0.
• When connecting the LAN cable with the ETH_DHCP value set to Enabled, the B-gate automatically brings IP information from the DHCP server (router). By printing the self-test of B-gate, you can check the IP assigned to B-gate.• Utilities are provided so that users can set up the interface.
• Web Utilities: It can be accessed by entering IP of B-gate in the address window of the web browser.
• Native Utilities: Utility apps that can run on each OS are provided.Wireless LAN
Connecting
• Connect the supported WLAN dongle to the B-gate, and turn on the B-gate.
• After B-gate booting is complete, proceed to "Opening the printer cover → Pressing the Feed key → Closing the printer cover", and the B-gate self-test describing the WLAN configuration information is printed.
• First check the network value in the self-test. If the value is adhoc, open the wireless connection menu of the host (PC, tablet, smartphone) and set it as adhoc before connecting. The default network mode for B-gate is adhoc, ESSID is BIXOLON_adhoc, and IP address is 192.168.1.1.
• If the value is infra, connect the host to the AP connected to the B-gate.
• Check the WLAN_DHCP value in the self-test. If the value is disable, the host (e.g. PC), open the network configuration and set the host's WLAN to the same as the B-gate's WLAN configuration. For example, if the default IP of the B-gate is 192.168.192.168, set the host IP to 192.168.192.x (x = 1 ~ 254) and Subnet Mask to 255.255.255.0.
• When connecting the LAN cable with the ETH_DHCP value set to enabled, the B-gate automatically brings IP information from the DHCP server (router). By printing the self-test of B-gate, you can check the IP assigned to B-gate.• Utilities are provided so that users can set up the interface.
• Web Utilities: It can be accessed by entering the IP of B-gate in the address window of web browser.
Connecting
• Turn on the B-gate that supports Bluetooth.
• After B-gate booting is complete, proceed to "Opening the printer cover → Pressing the Feed key → Closing the printer cover", and the B-gate self-test describing the WLAN configuration information is printed.
• Check the device Name value in the self-test.
• Pair the devices you want to connect from the list of devices found in the host.
• Utilities are provided so that users can set up the interface.
• Native Utilities: Utility apps that can run on each OS are provided.
How to install peripherals
ConnectingConnect supported peripherals to the USB-A type on the back of the B-gate, and turn on the B-gate.
After B-gate booting is complete, proceed to "Opening the printer cover → Pressing the Feed key → Closing the printer cover", and the B-gate self-test describing the enabled peripheral configuration information is printed.
Development Environment
Registering the developerDeveloper registration is mandatory for the iOS development.
Proceed after joining the Apple Developer Program.
See https://developer.apple.com/programs/
Sample Apps
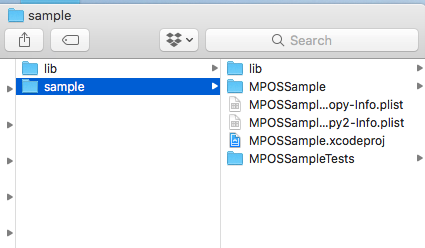
Running the sample code1) Download the sample app. (Link: http://bixolon.com/address)
2) Open the Sample folder and execute "MPOSSample.xcodeproj".
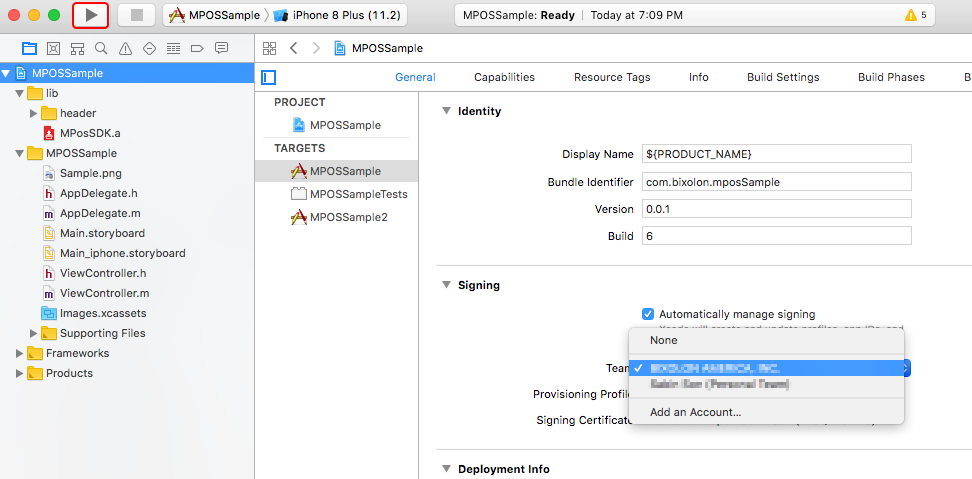
3) In the sample project setting, select the registered code signing as below.

4) Press the ▶ button in the upper left corner to run the app in the device.
Running the sample code
1) Screen description
|
|
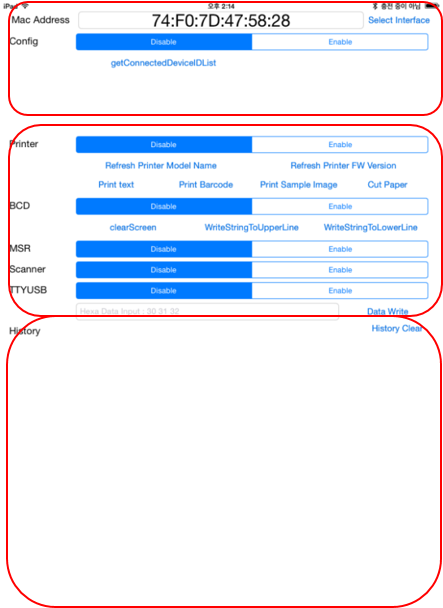
1. Specify the Interface and search for the connected devices.
2. The related functions of the printer and other devices are included.
3. The performance result of the function is displayed.
|
2) Entering the device’s MAC address
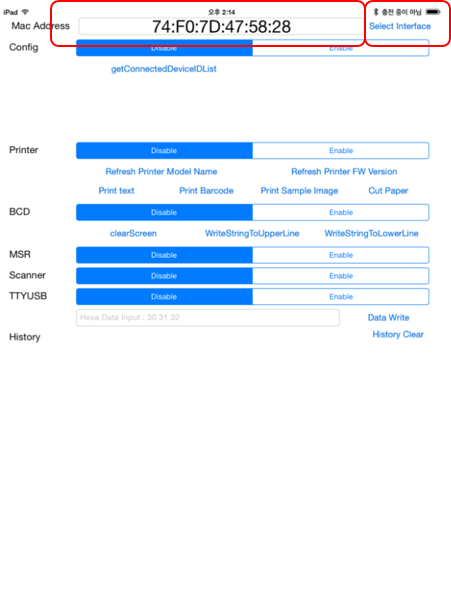 |
1. Enter the MAC address of the target printer.
2. Press Select Interface button.
|
3) Using the printing function
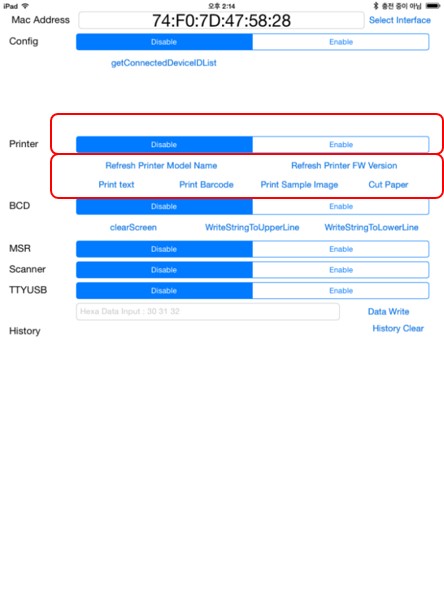 |
Select whether to use the printing function, or not.
The Functions of each button are as follows.
Refresh Printer Model Name
: checks the printer model name. : checks the printer FW version. : prints the text. : prints the barcode. : prints the sample image. : cuts paper when it is a model that supports the cutter. |